2008年12月31日星期三

仍然感到生活有点失落

想把 openbsd pf 好好学习学习,可是坐在办公室里,面对英文的图书,感到总是找不到北,大量的单词看不懂,就是看得懂,里面讲的协议我可是看着仍有点费解;干脆一个人茫茫然的骑自行车出校门后折向东,从星光厂子弟中学向东脑子一片茫然地向前骑,见到熟人也根本不想搭理任何人,穿过公园,沿着公园的北边又骑车到橡胶坝,河水已经枯了,水量很少,已不见往日的流水的气势;把车子推上沿河堤,根本不想骑,只是推着车子往前走
在蓝湾嘉园对面,一坐现代化的大桥正在修建,到处是火热的施工场面

2008年12月13日星期六

OpenBSD自带ftpd程序搭建ftp服务器

写在前面

本文参考OpenBSD3.8的官方FAQ文档和ftpd的man文档写成,更全面的信息请参看这两个文件。
·FAQ:SettingupAnonymousFTPServices
·ManualPage:ftpd
所有操作均在OpenBSD3.8Release上测试通过。
注:本文可以任意转载,但请保留作者信息,谢谢。

ftpd的三种启动方式

OpenBSD的ftpd程序没有配置文件,就靠设置运行参数进行配置。所有参数的
含义都可以在ftpd的man文档中获得详细信息:
$manftpd
ftpd程序的启动有三种方法:
·inetd方式
·'rc'方式
·直接在命令行下执行ftpd命令

1、inetd方式

在'etc/inetd.conf'文件中有这么一行:

ftpstreamtcpnowaitroot/usr/libexec/ftpdftpd-US
这里为'ftpd'传递了两个参数'-US'。当然,你还可以组合自己想要的参数。
(一些常用参数的含义已在下文给出)。使用inetd方式,ftpd由inetd进程管
理,所以需要启动inetd服务才能启动ftpd。在OpenBSD的默认设置中,inetd被
配置为随系统启动。查看'/etc/rc.conf'中的'inetd'变量的值:
inetd=YES

2、'rc'方式

所谓'rc'方式,指的就是通过修改'/etc/rc.conf'或者'/etc/rc.conf.local'文件中变
量的值,为服务的启动添加'entry',使服务能够随系统启动。使用'rc'方式启
动fttpd,只需要将'/etc/rc.conf'中的'ftpd_flags'变量设置为自己组合好的参数
即可。这种方法需要在系统重启后服务才会随系统启动(这里的参数暂时使用
与'inetd'方式相同的参数):

ftpd_flags="-US"

3、直接在命令行执行ftpd命令

这种方法的好处是不需要重新启动系统就可以启动ftpd服务:

#/usr/libexec/ftpd-4DllUS
停止ftpd

1、'/etc/rc.conf'

如果不需要ftpd随系统启动,则在'/etc/rc.conf'文件中将'ftpd_flags'变量的值设
置为"NO"”:

ftpd_flags="NO"

2、#killPID
如果需要现在就结束ftpd进程,则使用\killPID"的方式来实现:

#kill$(cat/var/run/ftpd.pid)
ftpd常用参数

以下是ftpd常用的一些参数(这里列出的只是常用的,并不是全部。更多的参
数请查看OpenBSD的ManualPage。

·-4如果指定了\-D"参数,则强制ftpd只使用IPv4地址。
·-6和\-4"的解释类似;如果指定了\-D"参数,则强制ftpd只使用IPv6地址。
·-A只允许匿名登录(除非指定了\-n"选项)。
·-D如果指定了该参数,ftpd将做为daemon运行,监听ftpd端口并且fork子进程对连接进行处理。在繁忙的服务器上,这样可以减少系统负载,与使用inetd方式启动ftpd比起来,这种方式使用更少的系统资源。
·-d使用LOGFTP将Debug信息写入syslog。
·-l 每个成功和失败的ftpsession都将由LOGFTP工具通过syslog记录下日志。如果这个选项被指定两次(-ll),所有get/put /append/delete/make、directory/remove、dire操作以及所操作的文件都将被记录进日志。
·-U每个并发的ftpsession都被记录到日志文件/var/run/utmp,记录的格式就象who(1)命令的输出一样。
·-n禁止匿名登录。默认是允许的。
·-S如果设置了这个参数,ftpd将会把所有匿名用户的下载情况记录在文件/var/log/ftpd中(如果该文件存在的话)。
·-Tmaxtimeout连接超时的时间限制。默认是2小时。
·-umask强制设置umask为指定的mask。而不是使用/etc/login.conf中的设置(/etc/login.conf中通常设置为022),并且不允许chmod。

常用参数组合

看了上面几个常用选项的含义,你应该可以组合出合适的选项来满足自己的功能需求了。

1、只允许使用系统帐号登录FTP
因 为匿名用户登录需要使用到系统中的一个名为"ftp"的帐户(更多关于该帐户的描述,请看本文下半部分),而OpenBSD系统中默认没有该帐户,需要手 动建立并且设置正确的权限,所以如果只允许用户通过系统帐号登录FTP服务器,则只需要在/etc/rc.conf中将ftpd°ags的值简单地设置 为"-D"即可(虽然这时候的设置仍然允许匿名用户登录,但是因为系统中没有"ftp"用户,所以无法登录)。当然你也可以多设置一些参数。比如:

ftpd°ags="-4DllUSn"
参考上面几个常用选项的说明,你就会明白这是什么意思了。
2、允许匿名用户登录访问FTP资源
因为匿名用户登录到FTP服务器后,实际上是以\ftp"用户的身份进行所有操作,所以出于安全考虑,这个用户的权限通常被设置得很低。比如:
·不为该用户提供一个可用的shell,使其无法登录系统;
·没有一个可用的密码(即FAQ上说的"Thisaccountshouldn'thaveausablepassword;");
·登录系统后被chroot;
·......
设置用于匿名访问FTP资源的'ftp'帐户

接下来我们要做的就是按照上面列出的三个要求来添加和设置这个低权限、处处受限的"ftp"用户。
1、添加"ftp"帐户以提供匿名访问
在/etc/shells中添加一个无法实际使用的shell设置"ftp"使用这个shell的目的,是不允许它通过shell登录到系统中。通常我们会有两种选择:
·/sbin/nologin
·/usr/bin/false
为了在添加用户时可以使用这两个shell,我们可以这样做:

#echo'/sbin/nologin'>>/etc/shells
#echo'/usr/bin/false'>>/etc/shells

或者在未将它们加入到/etc/shells的情况下,在使用adduser添加帐户时加上"-shell"参数:
#adduser-shell/sbin/nologin
Enterusername[]:ftp
Enterfullname[]:anonymousftpduser
Entershellbashcshkshnologinsh[/sbin/nologin]:
......

这里在询问该用户使用何种shell时就出现了/sbin/nologin。如果不带这个参
数,将无法使用它:
#adduser
Enterusername[]:ftp
Enterfullname[]:anonymousftpduser
Entershellbashcshkshnologinsh[bash]:/sbin/nologin
/sbin/nologin:isnotallowed!
Entershellbashcshkshnologinsh[bash]:

这里就提示了不允许使用/sbin/nologin做为shell使用。

添加帐户

这里使用"adduser-sshell/sbin/nologin"来添加一个这样的'ftp'帐户做为示例,并将该用户的$HOME目录设置为"/var/ftp":

#adduser-shell/sbin/nologin-home/var
Useoption\-silent"ifyoudon'twanttoseeallwarningsandquestions.
Reading/etc/shells
Check/etc/master.passwd
Check/etc/group
Ok,let'sgo.
Don'tworryaboutmistakes.Iwillgiveyouthechancelatertocorrectanyinput.
Enterusername[]:ftp
Enterfullname[]:anonymousftpduser
Entershellbashcshkshnologinsh[/sbin/nologin]:ENTER
Uid[1001]:ENTER
Logingroupftp[ftp]:ENTER
Logingroupis\ftp".Inviteftpintoothergroups:guestno
no
:ENTER
Loginclassdaemondefaultsta.[default]:ENTER
Enterpassword[]:ENTER#在此直接按ENTER键。

这样就可以设置一个不可用的密码。

Setthepasswordsothatusercannotlogon?(y/n)[n]:y
Name:ftp
Password:****
Fullname:anonymousftpduser
Uid:1001
Gid:1001(ftp)
Groups:ftp
LoginClass:default
HOME:/var/ftp
Shell:
OK?(y/n)[y]:y
Addeduser\ftp"
Copyˉlesfrom/etc/skelto/var/ftp
Addanotheruser?(y/n)[y]:n
Goodbye!
#

到这里,添加用户的工作就完成了。还需要把系统从'/etc/skel'复制到$HOME目录的一些"dotˉles"给删除,以免暴露信息。'dotˉles'的第一行通常会有一些系统的信息,比如'/.cshrc'文件中就有这么一句:
#$OpenBSD:dot.cshrc,v1.52005/02/1606:56:57matthieuExp$
这至少就告诉了匿名登录的用户,这是个OpenBSD系统。所以建议把它们删除:
#rm-f/var/ftp/.*
为FTP目录设置正确的权限

1、'ftp'目录
"ftp"目录表示"ftp"用户的主目录,在本例中就是"/var/ftp"目录。将它的owner设置为"root",权限设置为任何人都不可写(555):

#chown-Rroot:wheel/var/ftp
#chmod-R555/var/ftp

2、'ftp/bin'目录
这个目录并不是必须的。如果希望匿名用户登录到FTP后能够执行一些command,就可以将command复制到这个目录下。所有的command的权限都应该设置为只允许执行(111)。
#mkdir/var/ftp/bin
#chown-Rroot:ftp/var/ftp/bin
#chmod-R111/var/ftp/bin/*

3、'ftp/etc'目录
和"ftp/bin"目录一样,这也是个可选的,并不推荐创建它。(更多关于该目录设置的信息请查看"ftpd"的man文档)。
4、'ftp/pub"目录
这个目录用来存放你希望被匿名用户访问的文件。权限应该设置为555。
#chown-Rroot:ftp/var/ftp/pub
#chmod-R555/var/ftp/pub

这里虽然提到了创建三个目录,但是实际上我们只需要创建'ftp/pub'目录并设置好权限就可以了。
chroot匿名登录的用户

'ftpd'会将'/etc/ftpchroot'文件中列出的用户都chroot。要使'ftp'用户在登录ftp后被chroot,只需要简单地把用户名添加到这个文件中就可以了。这是一个示例文件:

#file:/etc/ftpchroot
#$OpenBSD:ftpchroot,v1.31996/07/1812:12:47deraadtExp$
##
listofusers(oneperline)givenftpaccesstoachrootedarea.
#readbyftpd(8).
ftp
bibby

'ftpd'在启动时会读取这个文件,如果'ftp'和'bibby'这两个用户登录ftp,将被分
别chroot到自己的$HOME目录下。
其他一些相关文件

·/etc/ftpusers{列出了所有不受欢迎的用户。列在该文件中的用户都无法
登录ftp服务器。
·/etc/ftpwelcome{欢迎信息。登录的用户都将在登录时看到这一信息。
·/etc/motd{如果'/etc/ftpwelcome'文件不存在,则使用'/etc/motd'文件的内容做为欢迎信息。
2.message{这个文件可以被放置在'ftp'目录下的任何一个子目录中。用户进入该目录时就会显示这个文件中的内容。

2008年12月12日星期五

Simple NFS usage

6.7 - Simple NFS usage

NFS, or Network File System, is used to share a filesystem over the network. A few choice man pages to read before trying to setup a NFS server are:

This section will go through the steps for a simple setup of NFS. This example details a server on a LAN, with clients accessing NFS on the LAN. It does not talk about securing NFS. We presume you have already setup packet filtering or other firewalling protection, to prevent outside access. If you are allowing outside access to your NFS server, and you have any kind of sensitive data stored on it, we strongly recommend that you employ IPsec. Otherwise, people can potentially see your NFS traffic. Someone could also pretend to be the IP address which you are allowing into your NFS server. There are several attacks that can result. When properly configured, IPsec protects against these types of attacks.

Setting up an NFS Server

These services must be enabled and running on the server:

By default each of these is disabled in OpenBSD. Add the following lines to rc.conf.local(8) to enable them:

portmap=YES
nfs_server=YES

The next step is to configure the list of filesystems that will be made available for clients to mount.

In this example, we have a server with IP address 10.0.0.1. This server will be serving NFS only to clients within its own subnet. All of this is configured in the /etc/exports file. This file lists which filesystems you wish to have accessible via NFS and defines who is able to access them. There are many options that you can use in /etc/exports; it is best that you read the exports(5) man page. For our example server, we've setup an exports file that looks like this:

#
# NFS exports Database
# See exports(5) for more information. Be very careful, misconfiguration
# of this file can result in your filesystems being readable by the world.
/work -alldirs -ro -network=10.0.0 -mask=255.255.255.0

This means that the local filesystem /work will be made available via NFS. The -alldirs option specifies that clients will be able to mount at any point under /work as well as /work itself. For example, if there was a directory called /work/monday, clients could mount /work (and have access to all files/directories underneath that directory) or they could mount /work/monday and have access to just the files/directories contained there. The -ro option specifies that clients will only be granted read-only access. The last two arguments specify that only clients within the 10.0.0.0 network using a netmask of 255.255.255.0 will be authorized to mount this filesystem. This is important for some servers that are accessible by different networks.

Another important security note: don't just add a filesystem to /etc/exports without some kind of list of allowed host(s). Without a list of hosts which can mount a particular directory, anyone who can reach your server will be able to mount your NFS exported directories.

Now you can start the server services. You can either reboot (after enabling them as per the instructions above) or run them manually.

# /usr/sbin/portmap
# echo -n >/var/db/mountdtab
# /sbin/mountd
# /sbin/nfsd -tun 4

The arguments passed to nfsd enable TCP (-t) and UDP (-u) connections and enable 4 instances (-n) of nfsd to run. You should set an appropriate number of NFS server instances to handle the maximum number of concurrent client requests that you want to service.

You're now ready to mount the exported filesystems from the client(s).

Remember: If you make changes to /etc/exports while NFS is already running, you need to make mountd aware of this! Just HUP mountd and the changes will take affect.

# kill -HUP `cat /var/run/mountd.pid`

Mounting NFS Filesystems

NFS filesystems can be mounted from a client without needing to enable any services or daemons. They can be mounted just like any other filesystem.

NFS filesystems should be mounted via mount(8), or more specifically, mount_nfs(8). To mount a filesystem /work on host 10.0.0.1 to local filesystem /mnt, do this (note that you don't need to use an IP address; mount will resolve host names):

# mount -t nfs 10.0.0.1:/work /mnt

To have that filesystem mounted at boot, add something like this to /etc/fstab:

10.0.0.1:/work /mnt nfs rw 0 0

It is important that you use 0 0 at the end of this line so that your computer does not try to fsck the NFS filesystem on boot. The other standard security options, such as noexec, nodev, and nosuid, should also be used where applicable. For example:

10.0.0.1:/work /mnt nfs rw,nodev,nosuid 0 0

This way, no devices or setuid programs on the NFS server can subvert security measures on the NFS client. If you are not mounting programs which you expect to run on the NFS client, add noexec to this list.

When accessing an NFS mount as the root user, the server automatically maps root's access to username "nobody" and group "nobody". This is important to know when considering file permissions. For example, take a file with these permissions:

-rw-------    1 root     wheel           0 Dec 31 03:00 _daily.B20143

If this file was on an NFS share and the root user tried to access this file from the NFS client, access would be denied. This is because the server uses the credentials of the user "nobody" when root tries to access the file. Since the user nobody doesn't have permissions to access the file, access is denied.

The user and group that root are mapped to are configurable via the exports(5) file on the NFS server.

Checking Stats on NFS

One thing to check to ensure NFS is operating properly is that all the daemons have properly registered with RPC. To do this, use rpcinfo(8).

$ rpcinfo -p 10.0.0.1
program vers proto port
100000 2 tcp 111 portmapper
100000 2 udp 111 portmapper
100005 1 udp 633 mountd
100005 3 udp 633 mountd
100005 1 tcp 916 mountd
100005 3 tcp 916 mountd
100003 2 udp 2049 nfs
100003 3 udp 2049 nfs
100003 2 tcp 2049 nfs
100003 3 tcp 2049 nfs

During normal usage, there are a few other utilities that allow you to see what is happening with NFS. One is showmount(8), which allows you to view what is currently mounted and who is mounting it. There is also nfsstat(1) which shows much more verbose statistics. To use showmount(8), try /usr/bin/showmount -a host. For example:

$ /usr/bin/showmount -a 10.0.0.1
All mount points on 10.0.0.1:
10.0.0.37:/work
This output shows that the client 10.0.0.37 has mounted the /work export being served from the server at 10.0.0.1.

2008年12月11日星期四

Configurando um servidor NFS

NFS, Network File System, é usado para compartilhar o sistema de arquivos através da rede.

Essa dica seguirá os passos para uma configuração simples do NFS. O exemplo detalha um servidor na rede LAN, com os clientes acessando o NFS.

Não falarei sobre a segurança no NFS presumindo que você já tenha instalado o packet filter ou outra proteção de firewall, prevenindo assim acessos de fora da rede.

Se você precisar liberar o NFS para fora da rede, sugiro que utilize algum método de acesso via VPN. De outra maneira, pessoas poderão capturar o seu tráfego NFS. Poderiam também forjar o endereço IP que está autorizado a acessar o servidor NFS.

Configurando um servidor NFS

Esses serviços devem estar ativados e rodando no servidor:

  • portmap
  • mountd
  • nfsd

Por padrão cada um deles está desativado no OpenBSD. Adicione as seguintes linhas em /etc/rc.conf.local para habilitá-los.

  portmap=YES
nfs_server=YES

O próximo passo é colocar a lista de arquivos que serão disponibilizados para a montagem pelos clientes.

Nesse exemplo, temos um servidor NFS com o endereço IP 10.0.0.1, que compartilha apenas para os clientes que estão na mesma subrede. Tudo isso é configurado no arquivo /etc/exports.

Nesse arquivo você coloca as pastas que deseja tornar acessíveis via NFS e define quem pode acessá-las. Há muitas opções que podem ser usadas em /etc/exports. Para o nosso exemplo de servidor, o arquivo de configuração do /etc/exports se parecesse com esse:

  ## NFS exports Database
# See exports(5) for more information. Be very careful, misconfiguration
# of this file can result in your filesystems being readable by the world.
/work -alldirs -ro -network=10.0.0 -mask=255.255.255.0

Isso significa que a pasta /work foi disponibilizada via NFS. A opção -alldirs, especifica que os clientes serão capazes de montar em qualquer ponto dentro de /work, bem como o próprio /work. Por exemplo:

  1. se dentro de /work tiver um diretório chamado /work/monday, os clientes poderiam montar /work e ter acesso a todos os arquivos e subdiretórios;
  2. ou eles poderiam montar /work/monday e ter acesso apenas aos arquivos e diretórios contidos nele. A opção -ro especifica que será concedido aos clientes apenas acesso de leitura. Os dois últimos argumentos especificam que apenas os clientes que estão na rede 10.0.0.0 e usando a máscara 255.255.255.0 serão autorizados a montar pasta. Isso é importante para servidores que são acessados por diferentes redes. Agora você pode iniciar o serviço ou reiniciar (após habilitá-los com as opões acima) ou executá-los manualmente.
      # /usr/sbin/portmap
    # echo -n >/var/db/mountdtab
    # /sbin/mountd
    # /sbin/nfsd -tun 4
    Argumentos passados para o nfsd para habilitá-lo com conexões TCP ( -t ) e UDP ( -u ) e habilitá-lo com 4 instancias ( -n ). Você deve setar apropriadamente o número de instâncias do NFS, para lidar com o número máximo de clientes. Agora está pronto para montar o sistema de arquivos a partir dos clientes. Lembre-se: se você fizer alterações em /etc/exportfs enquanto o NFS estiver rodando, será preciso reiniciar o serviço. Para isso basta um sinal de HUP e as alterações entrarão em vigor:
      # kill -HUP `cat /var/run/mountd.pid`
    ==Montando o sistema de arquivos NFS== O sistema de arquivos NFS pode ser montando nos clientes, sem a necessidade de qualquer serviço ou daemon, e também como qualquer outro sistema de arquivos. O NFS deve ser montando com o comando mount, ou mais especificamente com o comando mount_nfs. Para montar o sistema de arquivos /work no computador 10.0.0.1 e na pasta /mnt, siga o exemplo abaixo. Note que você não precisa utilizar o endereço ip, se estiver utilizando um servidor de DNS (named ou bind) por exemplo:
      # mount -t nfs 10.0.0.1:/work /mnt
    Para que o NFS seja montando no boot, adicione a seguinte linha no /etc/fstab:
      10.0.0.1:/work   /mnt   nfs   rw   0 0
    É importantíssimo que você use 0 0 no final dessa linha, para que o sistema não tente usar o fsck na inicialização. Outra opção de segurança, tal como o noexec, nodev,nosuid também devem ser usadas se for preciso:
      10.0.0.1:/work   /mnt   nfs   rw,nodev,nosuid   0 0
    Dessa forma, nenhum dispositivo ou programa com setuid bit no servidor NFS possa subverter as medidas de seguranças nos clientes NFS. Se você não for executar programas nos clientes NFS, pode-se adicionar a opção noexec. Quando acessar um ponto de montagem NFS com o usuário root, o servidor automaticamente mapeará o root para o usuário e grupo nobody . Isso é importante quando se leva em conta as permissões de arquivos. Por exemplo, ter um arquivo com essas permissões:
      -rw----- 1 root wheel 0 Dec 31 03:00 _daily.B20143
    Se esse arquivo foi compartilhado com o NFS e o usuário root tentar acessar esse arquivo a partir de um cliente NFS, o acesso será negado. Isso ocorre por que o servidor usa as credenciais do usuário nobody quando o usuário root tenta acessar o arquivo. Uma vez que nobody não tem permissão de acessar o arquivo, o acesso é negado. ==Checando o status do NFS== A fim de verificar se o NFS está funcionando corretamente e que todos os daemons estejam registrados em RCP, use o rpcinfo:
      # rpcinfo -p 10.0.0.1
    program vers proto port
    100000 2 tcp 111 portmapper
    100000 2 udp 111 portmapper
    100005 1 udp 633 mountd
    100005 3 udp 633 mountd
    100005 1 tcp 916 mountd
    100005 3 tcp 916 mountd
    100003 2 udp 2049 nfs
    100003 3 udp 2049 nfs
    100003 2 tcp 2049 nfs
    100003 3 tcp 2049 nfs
    Em condições normais de uso, existem outros utilitários que permitem ver o que está acontecendo com o NFS. Um deles é o showmount, que permite visualizar o que está montando atualmente e quem está montando o NFS. Há também o nfsstat, que mostra mais detalhes e estatísticas. Para utilizar o showmount tente /usr/bin/showmount -a host. Por exemplo:
      # /usr/bin/showmount -a 10.0.0.1
    All mount points on 10.0.0.1:
    10.0.0.37:/work
    A saída mostra que o cliente 10.0.0.37 tem montando o /work que foi exportado a partir do servidor 10.0.0.1.

OpenBSD NFS

OpenBSD NFS


Skeletor configuration


NFS configuration file is /etc/exports. There are many options that you can use in your /etc/exports file, and it is best that you read the exports(5) man page. Assuming the network is 10.0.0.0, we have an /etc/exports that looks like this:


CODE

# NFS exports Database

# See exports(5) for more information. Be very careful, misconfiguration

# of this file can result in your filesystems being readable by the world.

/mda -alldirs -ro -network=10.0.0 -mask=255.255.255.0


This means that the local filesystem /mda will be made available via NFS. -alldirs specifies that clients will be able to mount at any point under the /mda mount point. -ro specifies that it will only be allowed to be mounted read-only. The last two arguments specify that only clients within the 10.0.0.0 network using a netmask of 255.255.255.0 will be authorized to mount this filesystem. This is important for some servers that are accessible by different networks.


portmap(8) must be running for NFS to operate. Portmap is off by default on OpenBSD 3.2 and later, so you must add the line

CODE

portmap=YES

to rc.conf.local(8) and reboot.


Next, you should add the line

CODE

nfs_server=YES

to /etc/rc.conf.local. This will bring up both nfsd(8) and mountd(8) when you reboot.


Beastman configuration


You should add this code to your /etc/fstab


CODE

10.0.0.1:/mda /mnt nfs ro 0 0


or, if dns or /etc/hosts are configured properly,


CODE

skeletor:/mda /mnt nfs ro 0 0


I hope, you as an experienced user, know what to do with it? Such things as mounting it all without reboot should be common to you - just start the server manually with

CODE

/sbin/nfsd -tun 4

echo -n >/var/db/mountdtab

/sbin/mountd


And mount with

CODE

mount -o ro -t nfs skeletor:/mda /mnt


To restart the server, run

CODE

kill -HUP `cat /var/run/mountd.pid`


Run this to see stats

CODE

rpcinfo -p 10.0.0.1


NFS Server & Client on FreeBSD

NFS Server & Client on FreeBSD

July 22, 2007 - 3:15am
Submitted by EvilGod on July 22, 2007 - 3:15am.
FreeBSD

NFS refers to Network File System and as the name suggests allows any system to share a filesystem over the network.

NFS server configuration

NFS server is the system that allows other systems to mount it's filesystem as their own. The main daemons that need to be running are nfsd, mountd and rpcbind. Nfsd daemon services request from the clients and passes the requests to the mountd daemon. Mountd carries out the requests from nfsd. Rpcbind allows nfs clients to identify the ports that any RPC based service is running

Server side
Code:
vi /etc/rc.conf
nfs_server_enable="YES"
rpcbind_enable="YES"
mountd_flags="-r"
#if nfs client as well
nfs_client_enable="YES"

The filesystems to be exported are specified in /etc/exports
Code:
vi /etc/exports
#filesystem options remotesystems
#eg
/home -maproot=0:0 192.168.0.1
/home2 -ro 192.168.0.2

For various options see exportfs man page
The -maproot=root flag allows the root user on the remote system to write data on the exported file system as root. If the -maproot=root flag is not specified, then even if a user has root access on the remote system, he will not be able to modify files on the exported file system.

A remote host can only be specified once per file system, and may only have one default entry. For example, assume that /usr is a single file system. The following /etc/exports would be invalid:

Code:
# Invalid when /usr is one file system
/usr/src client
/usr/ports client

After changing /etc/exports reload nfsd server or mountd daemon
Code:
# /etc/rc.d/mountd onereload

Starting services on nfs server
Code:
/etc/rc.d/nfsd start
/etc/rc.d/rpcbind start
mountd -r

See exports
Code:
showmount -e
showmount -e "hostname"

Locking

Code:
rpc_lockd_enable="YES"
rpc_statd_enable="YES"

If i have missed something, then please comment friends..

2008年12月4日星期四

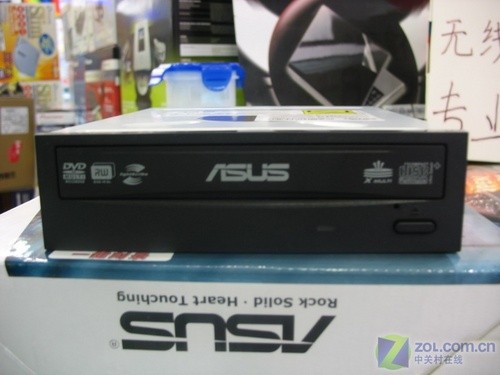
智能环保 华硕光雕王DRW-20B1LT评测

  [中关村在线光存储频道原创]前不久我们评测过的华硕极速光雕王DRW-20B1LT今天到货北京中关村卖场。这款具有“E-Green Engine智能休眠技术”、“Optimal Tuning Strategy刻录优化大师”等技术的新品,报价为289元。了解《智能环保 华硕光雕王DRW-20B1LT评测》。


华硕新品到

华硕极速光雕王 DRW-20B1LT

华硕新品到 华硕新品到
华硕极速光雕王 DRW-20B1LT 

  外观:上图就是刚刚到货的华硕DRW-20B1LT刻录机。刻录机采用了纯黑色磨砂材质的面板,流行的短机身设计。机身上盖采用了水滴型凹槽设计,这是“华硕AFFM II第二代空气流场导正技术”,可以让刻录过程更加平稳,保证刻录品质。

华硕新品到
华硕极速光雕王 DRW-20B1LT

  性能:华硕DRW-20B1LT具有2MB的缓存容量,采用了主流的SATA接 口,支持热插拔,数据传送速率达150MB/S。同时,该机支持20×DVD-/+R、8×DVD+RW复写、6×DVD-RW复写、16×DVD+R DL、12×DVD-R DL写入和12×DVD-RAM写入。CD方面,则支持48×CD-R写入和32×CD-RW复写,刻录速度达到了当前主流标准,特别是双层刻录提升到目 前的最高规格。

   目前华硕DRW-20B1LT刻录机随机附送的是Nero8,可支持“一键复制”功能,刻录更加简单。

  编辑点评:华硕DRW-20B1LT刻录机最新加入的技术为“E-Green Engine智能休眠技术”,在电脑开机后自动启动,自动侦测光驱操 作状况,在150秒之内一直侦测不到操作命令,它会转入E-Green模式,关闭那些“暂时没必要开着”的元件,减少电量消耗。这也是第一台提出节能概念 的刻录机。除此之外,DRW-20B1LT刻录机还有“OTS刻录优化大师”以及“AFFM II”技术支持,可以保证盘片刻录品质。只是由于新品刚刚上市,目前289元的价格并不便宜。

华硕 DRW-20B1LT
[参考价格] 289元
[联系方式] 鼎好A3457 010-82696066
[报价查询] 光驱产品报价 ASUS(华硕)产品报价